Many people who dive with a camera of any size exit the water totally stressed and complaining about the hassle they’ve had coping with the various challenges of diving with this extra element. And it’s true that a few things change when you’re not dedicating all your attention to diving as your sole underwater activity anymore. Taking a camera on a dive requires a few extra skills in addition to what you’ve already learned during your “regular” dives. What stays the same, however, are those principal rules of diving: Respect the creatures you want to photograph or video, keep your distance from them and don’t force them to move into a certain position.
Among the things that change when you’re diving with a camera are your breathing, buoyancy, task loading in general and overall diving technique. Read on for how to adapt:
Breathing: During your first dives with your camera you’ll use a lot more air than you normally do. One reason for your increased gas consumption is the new situation you’re experiencing. Totally focused on your camera, you’re likely very excited about your first underwater shots and, of course, eager for your friends back home to be impressed with the images. Don’t worry about that – once you get used to diving with your camera, your gas consumption will get back to normal.
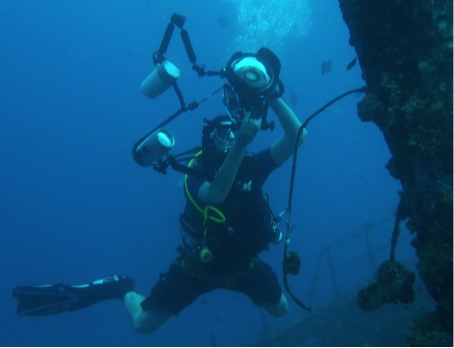
Buoyancy: You may have found your ideal positioning in the water without a camera, but when you add a camera to the equation things change. Depending on the size of your camera, you’ll have to hold the device with both hands, which will change your position and therefore your buoyancy control. To get steady shots you need a stable position in the water. So when it comes to shooting, you must remain perfectly still in order to get a steady and nicely composed shot. Wearing heavier gear gives you a bit of an advantage since the effect is more forgiving when you apply pressure on the “shoot” button.
Task loading: Having a new device along with you in the water does not mean you should neglect to remember the things you were trained to do while diving. It’s important to monitor your depth closely so you don’t go too deep trying to capture a certain shot. Drift dives present an additional challenge when it comes to deploying an SMB while you have a camera in your hands – make sure you can focus purely on the task just as you would without your camera. It helps to secure your camera by clipping it onto a piece of your equipment so you can keep both of your hands free.
Diving technique: If you’ve taken a specialty class where you were instructed on how to get the best shots, you know that you have to be close to your subject in order for the flash or strobes to be effective. You’ll also remember that you have to get under the subject you want to shoot for the colors to turn out the best.
Is it your first time with a camera? Do it right. These tips may help you get an easier start with a camera:
- Start with diving in a spot you know well (conditions, dive procedures)
- Monitor your air consumption, depth and dive time more frequently than you usually would.
- Keep your distance: Since you’re looking at your subject through your camera’s monitor, it sometimes happens that you can get too close and scare animals away.
- Your camera is not your buddy – make sure you don’t get separated from the group.
- Once task loading kicks in: Stop – breathe – think – act!
- Enjoy the shots you took and find the best way to keep safely shooting underwater.
by Guest Blogger Thomas Kempf
The following tips were put together by Quality-Diving to share the knowledge gained over the last years with the underwater photography community.