Safely ascend from every dive. Stay with your buddy. Take care of your equipment. Do buddy checks. Watch your air. We all heard those important mantras and more, over and over during our Open Water class. But do you really know how to use scuba safety equipment? You should, because properly doing so could save your life (and your buddy’s).

Scuba Safety Equipment
But how many of us learned about safety equipment or how to use it? About safety sausages, reels, lift bags, dive buoys and surface marker buoys? And that some of these terms actually refer to the same things, for that matter? Most likely, not many of us at all. And I’d be willing to bet that quite a few instructors either didn’t learn these things or haven’t used the devices in so long that they’ve forgotten how to use them safely and correctly.
PADI doesn’t include teaching about these safety devices in its Open Water classes. Only in certain specialty courses will you learn about them. But that doesn’t mean it’s too late. PADI sets guidelines and rules about what we are required to teach. But it doesn’t tell us we can’t add something to our course once we’ve covered the official coursework (keeping within certain limits, of course). So if you’re an instructor, please consider teaching your students how and when to use SMBs (surface marker buoys). And if you’re a student, ask your instructor about safety equipment.
SMB or DSMB?
There’s a difference between a surface marker buoy (SMB) and a delayed surface marker buoy (DSMB), although both essentially accomplish the same goal. You’ll generally use an SMB while on the surface in order to make yourself more visible to boats. You will deploy a DSMB while you’re still underwater, to alert those the surface that a diver is below and either decompressing or ascending.
So, when and why would you need to use either?
SMB
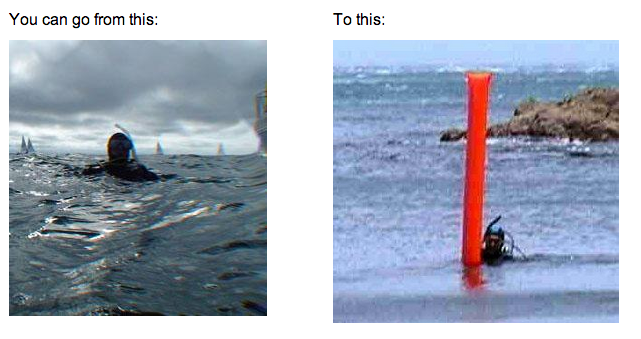
After a long dive on a deep reef, you can’t wait to get to the boat and look through your pictures. But because you followed fish and other marine life around, you’ve incorrectly navigated and lost the boat’s position. You and your buddy surface with minimal air and see the boat off in the distance. Way in the distance. There’s a bit of a current where you’ve surfaced and it’s putting more distance between you and the boat.
As you wave your arms to get the boat’s attention, a voice in the back of your mind tells you how futile the effort likely is. You can’t see the people, so what are the chances they see you? Then another voice pipes in as you resign yourself to the long surface swim against the current back toward the boat: Why the heck didn’t I buy an SMB? Fortunately for you, your buddy did. In a matter of seconds, a bright orange inflatable is sticking up five feet off the surface of the water, signaling your position. And once the boat has gotten the other divers onboard, they pull anchor and swing by to get you and your buddy, too.
Divers surface a good distance from the boat more often than you might think. Why is unimportant in this article; here we’ll focus on what you can do to prepare for the situation. You might think it’s easy to spot people floating on the surface of the water, but that is not the case. Next time you’re on a boat, look around if there are other dive boats and divers in the water nearby. Notice how hard it is to spot just a head and shoulders on the surface of the water. Imagine how much more difficult it is when that head and shoulders are even farther away. Now imagine the water is choppy with whitecaps, it’s windy and overcast, and dusk is descending.
Do you see where I’m going with this? An SMB or safety sausage is a cheap piece of safety equipment that takes up minimal space in your dive gear. Mine is tucked away in a pocket. You can hook one onto a BCD D-ring, onto your tank, or any number of other locations. In short, there’s no reason not to have an SMB with you on all dives. Unless, of course, you just really, really trust that this could never happen to you.
So which SMB do you buy? There are many different sizes of safety sausages or SMBs. I recommend one at least 6 feet long. You want to make sure that if large swells are a factor, the boat will still see your marker above them. Some are made of thin material intended for one-time use only. But for the price, it really makes more sense to get an SMB made from heavier material that’s good for repeated use. The last thing you want is for your SMB to rip apart when you fill it with air. Of all the colors available, the most visible are fluorescent yellow and orange.
When it comes to inflating an SMB at the surface, it hardly gets simpler. You open and unroll it and then either inflate it with the provided tube, or with your regulator. Then just hold onto it (consider clipping it to you since you don’t want to lose it) and hold the SMB up straight. Even if you’re sure the boat has seen you, keep the device inflated and pointing up until the boat gets close so you can be sure other boat traffic can see you, too. I would also recommend practicing at least once with your newly purchased SMB before taking it on dives with you. That way you’ll be familiar with how it works and won’t risk fumbling around in a potentially stressful situation. Even though they’re pretty simple to use on the surface, a little practice with these things is a good idea.
Video of SMB inflation at Surface:
Delayed Surface Marker Buoy (DSMB)
When it comes to inflating a surface marker buoy underwater, things get a little trickier. There are three primary concerns: getting the air into the buoy, keeping the buoy secure and not letting it get away from you, and making sure you get to the surface at a safe speed of ascent by ensuring the inflated buoy doesn’t pull you up.
Let’s start with discussing keeping the buoy secure.
The easiest method for this, I’ve found, is to use a finger spool. Prior to inflating, attach the line to the buoy and keep a hold of the spool itself – this is key since one of the easiest things to do is to lose grip of the attached spool and have it fly to the surface when the buoy inflates. Hold tight to the spool and be ready for the inevitable tension when the air goes into the buoy. Also, keep the spool away from other gear and at an arm’s length from your body, if possible.
Next up is getting air into the buoy.
You will inflate some DSMBs orally. Remove the regulator from your mouth and blow into the buoy. Then, replace the regulator, repeating as needed until the buoy has enough air to shoot to the surface. Most buoys have large openings at the bottom where you can direct air a little more freely, much like a lift bag. There are three different ways to add air into devices like these, and each has its pros and cons.
- Using your alternate air source: the pro is that it’s quick and easy, but the con is that you’re using a precious, finite resource and it’s easy to overfill the buoy.
- Using the exhaust from your regulator: the pro is that you don’t waste air, but the con is that it can be trickier to keep hold of the buoy as you’re inflating it.
- Using the air from your BCD: the pro is that it doesn’t affect your buoyancy since air is just being transferred, but the con is that this can be a tricky technique depending on the set up of your BCD.
Whichever option you choose, the process is essentially the same for inflating the DSMB. You open the air source under the bottom of the buoy so that the bubbles shoot up into the buoy. Add just a bit of air at a time so you can keep control of the buoy and your buoyancy. And don’t fill the buoy to max all at once at depth, since you just need enough air to get it to the surface and standing up.
Once you’ve inflated the buoy, you can release it when you’re ready. Let the spool unwind itself by letting it spin around your thumb and forefinger, keeping it away from your body and other gear. The video below helps show this if you need a better visual. While it’s important to keep a good grip on the spool, I wouldn’t recommend attaching it to your body since this increases the risk of entanglement. Once the buoy is at the surface, you’ll need to secure the line so it doesn’t continue to unravel and produce an entanglement nightmare until you’re ready to ascend. Upon ascent, wind the line back onto the spool as you go, making sure that you don’t go up any faster than you can wrap the line.
Speaking of ascending, using a spool and SMB means making a slow ascent. Of course, this is the way we should always ascend anyway. But it’s particularly important when you’re holding an inflatable with dozens of feet of line attached to it that you have to continually roll back onto the spool. Keep in mind that you may have to release air from your BCD to keep your ascent rate under control. Hold the spool and line securely with one hand and release air from your BCD. Then continue your ascent and carry on with wrapping the line.
The combination of tasks you’re undertaking along with the inflated buoy you’re holding onto means you must make a slow, deliberate ascent. Don’t rush through the process and risk entanglement in the line or becoming too buoyant. You don’t want to arrive on the surface looking like a mummy.
If you need to do a safety or decompression stop, secure the line tightly. Adjust your buoyancy and hover with the spool. If you lack another visual reference, the dangling spool can serve as a good one. Once at the surface, secure the line again and hold onto the buoy until you’re back on the boat.
Practice with a DSMB. Don’t let the first time you ever try to use one be the first time you actually need it. Practice using this important piece of equipment until you feel comfortable with it!
Here’s a good video of a DSMB deployment using an oral inflator:
When or why would you use a DSMB?
Without going into too much detail, here are some situations where you might need to use a DSMB. I welcome diver input on other situations where you’ll need a DSMB.
- While making an ascent without the anchor or mooring line you may have come down on
- During drift dives in any number of locations (for many drift dives, you will need a DSMB)
- When diving in a strong current (the DSMB helps the boat keep tabs on you)
- On decompression or safety stops without any other visual reference
- While surfacing in an area with heavy boat traffic, either in a lake or the ocean
- Any time you are surfacing without knowing exactly where you’re coming up and if it’s a safe location to surface
Hopefully you’ve learned a little more about a very important, inexpensive and easy to use piece of safety equipment. If you don’t have one already, I hope you go purchase one of these devices right away and practice using it!